Saturday, August 8, 2020

Game Analysis: Different Openings Doesn't Mean Different Ideas!

Hello everyone and welcome. For the previous five months, activity has been restricted to online rapid play and correspondence, and since rapid play usually has little to show for it, and correspondence games, and at that, decisive correspondence games, take for ever to occur, we haven't seen a lot of usable material for articles this year.

That said, we now at least have the "Prohibition" series at the Charlotte Chess Center, playing one game a week on Tuesday nights. It's not much, but it's something, and hopefully will allow for somewhat more frequent publication here.

This week, we are going to look at a game from this past Tuesday. As the article title implies, we are going to see a theme in this game that has been seen multiple times before, and not always with the same opening.

First, if you look at The French Connection: Volume 31, you will see that we have an Advance French where Black's Light-Squared Bishop is not very good, but yet, it held Black's position together, and White eliminated it and won shortly after that.

Next, in the lone July publication, Game Analysis: Developing Your Pieces Wisely, we saw an offbeat Closed Sicilian with Black's Light-Squared Bishop ended up not being a very good piece, but yet again, the elimination of it was ultimately the move the caused Black to resign!

Well, this time, we are going to be looking at a more mainstream line of the Closed Sicilian, and you guessed it, Black's Light-Squared Bishop ends up not being very good, but getting rid of it is exactly what White does, and this time, it will lead to a local piece superiority for White on the Kingside, where ultimately a "4-on-2" scenario will force Black's resignation.

So without further ado, let's take a look at the feature game:


Prohibition, Round 2
W: Patrick McCartney (2059)
B: Garrett Browning (1734)
Closed Sicilian

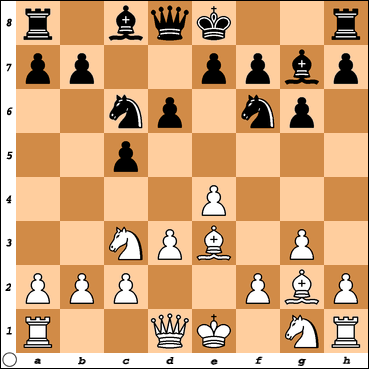
1.e4 c5 2.Nc3 g6 3.g3 Bg7 4.Bg2 Nc6 5.d3 Nf6

While this move is ok, more common, and more flexible, is 5...d6. As we will see, Black will end up playing this move anyway, and actually it's Black's very next move. However, this gives away Black's plan. One unique feature about the Closed Sicilian is that there is a ton of flexibility, and often times, one line can easily transpose into another.

For example, after 5...d6, the two main lines for White are 6.Be3 and 6.f4, and then there are also the slightly offbeat lines which mainly involve developing the King's Knight, whether it be the most common 6.Nge2, Duncan Suttles' favorite move, 6.Nh3, or even in some cases, though not common in the Closed Sicilian without advancing the f-pawn first, the move 6.Nf3 is occasionally played.

Against the two main lines, Black has 6...e6, 6...e5, 6...Rb8, and 6...Nf6 all as legitimate options against both main moves, and they can easily transpose into each other. For example 6.Be3 Rb8 7.Qd2 b5 8.f4 can also arise from 6.f4 Rb8 7.Be3 b5 8.Qd2. While theoretically, with best play, the Closed Sicilian is basically equal, the massive number of options, and accounting for all the transpositions between the 6.Be3 and 6.f4 lines, can easily cause Black to wrongfully intertwine ideas across different lines, especially when transpositions actually do occur.

So the moral of the story is, flexibility is almost always better than early commitment, but flexibility can also bite you if you are unable to account for all scenarios in what is a fluid situation.

6.Be3 d6


So now we have the line with 6.Be3 Nf6. This response by Black is actually slightly tricky. While not an issue against 6.f4, when White plays 6.Be3, he has to watch out for ...Ng4 tricks by Black. The reason for White to play an early 6.Be3 is actually to trade off the Bishop in most cases, but White does not want Black's Knight for it. He wants Black's fianchettoed Bishop, leaving Black with weak dark squares on the Kingside.

Therefore, to prevent this issue, White's next move is actually forced.

7.h3

Preventing 7...Ng4.

7.O-O 8.Qd2 Bd7

In the other Closed Sicilian article referenced in the introduction, we saw Black play an early ...Be6, which turned out to not be very good, despite the number of decent options that Black had. It got kicked back with an early f5 by White, and remained passive. Here, once again, we see Black with a number of decent options. Guess what? Moving this Bishop wasn't one of them. It can sit passive on d7, or it can sit passive on c8, and actually, from c8, it's more flexible as it can also to go b7 or even sometimes a6 becomes a good square for the Bishop with White's Bishop being fianchettoed. Why waste a move relocating a piece from one passive spot to another. It is not like it is immediately in the way of the other pieces. Seeing White's goal is to eliminate the dark-squared Bishops and execute a direct attack on the Kingside, Black's focus should be on the Queenside or in the center, and therefore, Black is best off playing either 8...Rb8, getting off the diagonal of White's g2-Bishop and also promoting the idea of storming the b-pawn down the board. The other idea is to play ...Nd4 and ...e5, which in this case, since the White Knight has not been developed yet to e2, Black can play these moves in either order. Had the Knight already been there, it might be most desirable to play ...e5 first and only then ...Nd4.

So we see multiple possibilities for Black that all focus on executing counter-play on the Queenside or down the middle. This Bishop move does none of that. That said, we are about to see White set up a Kingside attack, and eventually get Black to relinquish this piece that appears so passive and bad, despite it playing a fairly key defensive role. For example, take the French Defense, which is the first game in the introduction referenced, and take the Closed Sicilian. What is a key pawn break for both openings for White? The f5-push! Once the f-pawn is traded off, the f5-square for White's pieces can be a valuable source. If Black doesn't aggressively use the Bishop to attack down the f1-a6 diagonal or the long diagonal from b7, it can often be a valuable defensive piece to contest one of Black's weaker squares in this opening, f5. We will see White virtually force Black to relocate and then trade off this passive but valuable piece just like we did in the two games referenced at the beginning.

So what we see here is another case of mis-handling of what appears to be a bad piece that instead can play a vital role.

9.Bh6 Rb8 10.Nge2 Nd4

So now, suddenly, we see Black blending both of the ideas mentioned earlier, but why not do this without moving the Bishop and saving yourself a tempo?

At this point, due to the threat of the Knight deflecting the Queen away from the guarding of the h6-Bishop, it is time for White to release the tension and trade the Bishops.

11.Bxg7 Kxg7 12.g4

White starts his Kingside expansion, and opens up the g3-square for the Knight if Black doesn't trade soon.

12...Qa5

On one count, this move appears to be extremely annoying. White did not eliminate the Bishops just so that the Queens could get eliminated and we head closer to an endgame. White is ready to attack. On the flip side, this also puts a critical piece of Black's on the Queenside, and is one less piece to defend the King. Keeping in mind that Black is, for all intents and purposes, a move behind from the norm due to his Bishop move on move 8, going for the center and advancing his Queenside pawns may be better than trying to throw his pieces out to the Queenside. If it means Black wins a pawn eventually, or even two, so be it. White doesn't care. With this abandonment, White is going full-fledged at this point for a Kingside attack.

The best move here was probably 12...e5, with a fairly balanced position.

13.f4

Another thing should be noted here for those that want to play this line as White. In the 6.Be3 lines of the Closed Sicilian, where White often plays Qd2 early on, if there is a Black Knight on d4, you always have to watch out for forks of the King and Queen. This is especially true when there is a dangling pawn on h3, or if the Bishop is already on g4. In this particular case, it is not critical to advance before castling. But sometimes it is. For example, had White not already advanced g4, and the g-pawn was still on g3, then castling would be a big mistake because Black could then take the pawn on h3 with the Bishop because if White takes back, there is a royal fork on f3. By not castling, the Rook covers h3. Therefore, often times, this advancement of f4 can be critical before castling in these lines with a Queen on d2 so that when White does castle, there is no ...Bxh3 trick because the Bishop can recapture since the Rook on f1 would then cover the f3-square, which it is not covering if the pawn is still on f2.

Therefore, while this f4 move may not be critical in this particular scenario, even if White did castle now, he's gonna play f4 the next move anyway, so why not do it now? In addition, it takes advantage of Black not playing 12...e5. With 12...e5, Black can answer this move with 13...exf4, not allowing the f5-advance. Here, we will see Black play the move ...e5 a move too late, and White will get his pawn to the f5-square.

13...e5 14.f5 b5 15.O-O Bc6

Here, Black sees no future in the Bishop on its current diagonal, but we will see White now put f5 to good use. It was probably best for Black to play 15...Nxe2. Now the White Knight will move away, leaving the d4-Knight dangling out there, and we will soon see this become a problem for Black.

16.Ng3 b4


So what should White do here? Should he play 17.Nd5, enticing a trade from Black? Should he play 17.Nce2 offering a Knight trade? Should he play 17.Nd1, re-routing to e3? Should he play 17...Nb1, guarding the Queen? Or should he ignore it, let Black take, and attack the Kingside with a move like 17.fxg6 with ideas of 18.Qg5 if Black takes the Knight?

17.Nd5

It turns out this move and 17.Nd1, rerouting the Knight to e3 with an attack on the Kingside, are both very strong. 17.Nce2 is ok and enough for a slight edge for White, but no more. 17.Nb1 is just passive and not good at all, and 17.fxg6 just doesn't work in this case. Black can safely take the Knight and is simply winning with just a little bit of care taken for his King.

17...Bxd5 18.exd5

So here we see the theme again of the elimination of what appears to be a bad Bishop. Turns out it was simply passive, not bad. Now the d5-pawn will play an important role.

18...Rbc8

And now, with Black on the brink of defeat, White plays the wrong move here.

19.Nh5+?!

Correct here is either 19.c3 or 19.fxg6 and then 20.c3. The idea in the former case is that after 19...bxc3 20.bxc3 a6 (The pawn is pinned, and so the Knight doesn't need to move) 21.g5 Nd7 22.f6+ Kh8 23.Ne4 Nf5 24.Rxf5! gxf5 25.Nxd6 c4 (Black has nothing better here) 26.d4 exd4 27.Qxd4 Rcd8 28.Nb7 Qb6 29.Nxd8 Qxd4+ 30.cxd4 Rxd8 31.Rc1 h6 32.h4 Kh7 33.Rxc4 Kg6, the endgame is completely winning for White.

White still has a clear advantage after the game move, but the 19.c3 idea is outright winning.

19...Nxh5

The only move! 19...gxh5 20.Qg5+ gets the Knight back and Black's position is a train wreck.

20.gxh5 f6

Neither pawn can be taken. If either is taken with the g-pawn, you have the Qg5+ problem again. 20...Nxf5?? loses immediately to 21.Rxf5! and if 21...gxf5??, then 22.Qg5+ Kh8 23.Qf6+ Kg8 24.h6 and Black is mated on the next move.

21.fxg6!

The correct pawn to take with, opening up the f-file.

21...hxg6 22.hxg6?

This move throws away the advantage. 22.Be4! is the correct move. If 22...f5, White can ignore the threat and play 23.Qg5!, winning.

22...Qd8??

Black misses out on his one and only opportunity. 22...c4! and now it is White that has to play the right moves to draw the game. The idea is that 23.c3?? is too slow now and 23...bxc3 24.bxc3 cxd3! and the White c-pawn will fall. Therefore, White would have to settle for 23.Qf2 or 23.dxc4 with an equal position.


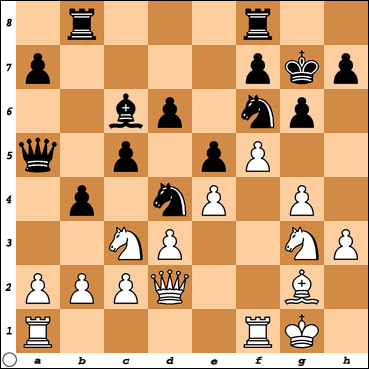
White to move and win!

23.c3!

This move does the trick. Remember how it was mentioned that the d5-pawn would play an important role? If you look at all the places the Knight can go, there is only one safe square, b5. This is about as far away from the action as possible. Black would like to play ...f5 to open up his Queen and bring his pieces to the defense of his King. However, with this move, White deflects the Knight away to la-la-land, and the f5-square will be in White's total control before Black is able to free his position via advancing the f-pawn. By blocking the f-pawn, the Queen and f8-Rook have limited effect on the defense of the Black King, and the c8-Rook and Knight are basically useless. Meanwhile, White can easily bring all of his pieces to the Kingside, creating a 4-on-2 scenario via putting his Bishop on e4, and tripling on the f-file with his heavy pieces, which will eventually swing to the g- and h-files and swarm the Black King to his misery.

23...Nb5 24.Rf5!

The blockading move that is key to White's victory.

24...Kxg6 25.Raf1 Rg8 26.Qf2 1-0

Black resigned as there is no stopping the attack. The moment the King goes to f7, in any attempt to run, the f6-pawn falls as does then the King, and if Black waits, White can play Be4 and then swing the heavy pieces to the g- and h-file.


So what we saw here is repeated themes from previous articles, including those involving different openings like the French Advance. It is critical to realize that when you study a subject like openings, it's not like you can compartmentalize each opening into its own little box like a bunch of separated hamsters. It's not like all ideas in the French don't apply to other openings - such as the game shown here and in the second referenced game in the introduction, where many of the ideas in the French, especially those ideas of White's, are virtually carbon-copied in the Closed Sicilian. This can be said for many other pairs of openings that do not even feature the same pawn structure, but the same ideas often apply.

Therefore, when studying openings, do not just think that each opening is by itself and that each have strictly their own ideas. If you truly put in the work to understand an opening, and all of it's ideas beyond the opening moves, you will soon realize that other openings can easily have the same or at least similar ideas, and that often can be, and should be, used to decide your opening repertoire as a whole. Some openings are simply night and day, like the French and the Grunfeld. There is very little, if anything, that can be learned from one of those openings and applied to the other. But openings like the French and the Sicilian (blockades and pawn breaks - d5 in the Sicilian, e5 in the French, along with levers, like f5 for White) or the Queen's Gambit and Nimzo-Indian (Carlsbad Pawn Structure, the e4-lever for White, etc) can have extremely similar ideas and this should be used to your advantage when trying to expand your repertoire, rather than saying something like "Man, I'd tired of the Sicilian Najdorf, let's put all the other King Pawn openings in a hat and draw one at random for what I should study next!". In cases like that, you really are starting over, but that is not at all necessary. Those that have known me for the full 25 years that I've played will know that while I have played the French religiously that I have also played the Sicilian (Najdorf and Taimanov), and there is a reason that I played those, and not something random like the Pirc, which I haven't played since 1996 except the couple of rare cases that come from a transposition from the King's Indian Defense where usually it's an insipid line by White that gives him nothing, but the Pirc proper I have not played since the 90s.

Greater success will come if you put together a repertoire that meshes together well rather than random selection and thinking of "Studying White", "Studying Black vs e4" and "Studying Black vs d4" as three separate projects. It shouldn't be. It should be one big project where everything goes together nicely.


This concludes this article on "Different Openings Doesn't Mean Different Ideas". Until next time, good luck in whatever games you are able to play, and stay safe during this pandemic.

Saturday, July 11, 2020

Game Analysis: Developing Your Pieces Wisely

Hello everyone and welcome. As chess continues to be unavailable over the board, I am continuing to cover decisive games and exciting draws in the world of correspondence chess. The feature game today comes from the IV Argentine Cup, a large, 35 bracket tournament with 7 players per bracket and multi-entry. The cost to get in was 10 Euro, but there was a 6-for-5 deal, and so I am one that decided to take up on that offer, and have 36 games going across 6 brackets in that tournament. The top finisher in each bracket moves on to the semi-finals, and then there will likely be a few second places finishers that advance to fill up the brackets for the semi-finals. There was also an option for players over 2300 that they could pay $20 per bracket or 6 for $100 if they wanted to start in the Semi-Finals and not have to qualify in the preliminaries.

While the games themselves are not visible to the public, you can follow the results by clicking HERE. If you are looking to follow specifically my results, I can tell you that I'm in brackets 7, 9, 12, 13, 17, and 22. Thus far, only 3 of my 36 games have completed as this only started in mid-June. I have a win and a draw in bracket 12 (the win being the feature game of this article) and a draw in bracket 17.

Without further ado, let's analyze today's feature game.


IV Argentine Cup, Preliminaries, Bracket 12
W: Patrick McCartney (USA - 1900)
B: Giel Massy (NED - 2221)
Closed Sicilian

1.e4 c5 2.Nc3 d6

This move is often played by Najdorf players to avoid getting move-ordered. For example, after the most common move, 2...Nc6, White can play 3.Nf3, and after 3...d6 4.d4, a Najdorf player has just been tricked as the Knight almost always goes to d7 in the Najdorf, and so you have to be careful how you respond to 2.Nc3 and make sure that your lines in the Open Sicilian, Closed Sicilian, and Grand Prix Attack all mesh together.

Another common move by both Najdorf players and Kan players is 2...a6, and Kan players can also play 2...e6. Those that play a line of the Sicilian where the Queen's Knight goes to c6 anyway, like the Dragon or Classical or one of many other variations, you are probably best off playing 2...Nc6 only because it's the most flexible move, not because it is in any way systemically better.

3.g3

White reveals his intentions. 3.Nf3 would lead to the Open Sicilian while 3.f4 would be a Grand Prix attack.

3...e5

While this Botvinnik type of structure is a common defense to the Closed Sicilian, and particularly in White's two main lines of the Closed Sicilian, which are 6.f4 and 6.Be3 (after 1.e4 c5 2.Nc3 Nc6 3.g3 g6 4.Bg2 Bg7 5.d3 d6), it may be a tad early to commit to this as White does have other sidelines where this may not be best. That said, it is not an outright bad move, and is surely not what lost Black this game, though we will see White put d5 to good use later on in the game.

4.Bg2 Nf6 5.d3


Now, this is actually a slightly unusual position already for the Closed Sicilian, but that doesn't make it bad. This is why I always harp on not "memorizing" openings, but rather, "understanding" them. Ask yourself the question, "What is White looking to accomplish?" White has committed his Knight to c3, blocking the c-pawn. He has already played d3 instead of d4. He has not developed his King's Knight yet, leaving the f-pawn free to advance. He "could" try to advance a3 and b4, but does this make sense here? Sure, if Black does something weird to force the issue, White might advance on the Queenside, but in normal circumstances, is White going for a Queenside attack? His two main features are domination of the d5-square, controlled with the Knight on c3, Pawn on e4, and Bishop on g2, and Kingside mobility. So White is likely to play on this sector of the board. Therefore, Black's counterplay is likely to be on the Queenside, and possibly the d4-square, a very weak square for White. So there are a number of moves that Black can play here:
  • He can play 5...Nc6, developing a piece toward the center, adding to his control of the d4-square, and covering e5 in anticipation of an advancement of the White f-pawn.
  • He can play 5...Be7, looking to get his King castled before expanding on the Queenside.
  • He can still play 5...g6, though the early commitment of the Knight to f6 may limit a few of his options, though it's not "bad".
  • He can expand on the Queenside with his pawns starting with 5...a6, looking to play ...b7-b5-b4.
  • He can even play a move like 5...h6 to simply prevent a pin by White, though it is highly unlikely that White will be looking to do this. The Bishop will usually be developed to e3 in the Closed Sicilian to eye d4 and continue to point to the Kingside.

So as we can see, one feature about the Closed Sicilian, while maybe not as advantageous for White as the Open Sicilian is, is that it is a very flexible opening. There are many ways that the game can go, and those that have played tournament chess long enough will also know that it's an excellent opening for rated blitz tournaments, the idea being that with there be literally so much choice for Black, he will waste a lot of time early on trying to figure out the best moves. Now, of course, this is a correspondence game, and so that is not an advantage that White can take in this case, but with books and machines, sometimes the flexibility leads to a more interesting game than playing 45 book moves of Dragon and agree to a draw!

All of that said, what Black does here is not a wise move at all!

5...Be6?

After everything that we described in the previous note, how, in any way, does this move make any sense at all? If there is one piece that Black doesn't want to play here, it's the Light-Squared Bishop. The main reason for this is White's current flexibility. In this structure, the Knight is almost surely going to c6. The Bishop can go to e7 or g7, but it needs to move anyway for Black to be able to castle. But moving this Bishop early just dictates to White what he needs to do. Going 5...Bg4 makes no sense either as 6.f3 just drives it back and White can time f4 at his free will. By going to e6, Black is just screaming for White to advance his f-pawn. In many lines of the Closed Sicilian, White's f-pawn is one of the key breaks, and especially going to f5. Now if the Knight were not on f6, one could argue that Black intended to respond to an f4-push with the move ...f6 and tuck the Bishop on f7, similar to what White does in many lines of the Closed Sicilian where he retreats the e3-Bishop to f2 in order to avoid any pawn forks on d4, and also if Black plops a Knight there, White could trade a Knight on d4 without getting his other Knight on c3 and Bishop on e3 forked by the re-capture.

All of that said, with the Knight already on f6, this Be6 move is probably the most illogical move on the board that doesn't outright hang a piece.

White needed no time at all to figure out his next move.

6.f4!

Of course! Intending to play f5!

6...exf4 7.gxf4

Yes! Taking with the pawn and maintaining the threat to the Bishop is the right way to recapture. Remember this concept of flexibility I mentioned in the Closed Sicilian? Here, it might look tempting for Black to just try to throw everything at the Kingside, despite that not being the usual side for Black to attack in the Closed Sicilian. Well, White hasn't castled yet, and so if he sees Black throwing all of his forces over there, he still can actually castle Queenside and with confidence, despite it not being the usual way for White to play this line. So yes, do not fear taking with the g-pawn. In addition, this will lead to attacks on the King if Black castles that way, and with his c-pawn advanced, it's not like the Queenside is all that terribly safe for Black either while White's Queenside is still intact.

7...Nc6 8.f5!

White does not fear the slight weakening of another central dark square, in this case e5. Black's Knight on f6 is misplaced and it will take Black a while to create any kind of dark-square domination, unlike White, who already has the light squares under total control. Black's light-squared Bishop is being pushed back, whereas White's dark-squared Bishop can influence d4 and/or e5 by putting his Bishop safely on f4, e3, or b2. He also still has the flexibility of where to put his King.

All told, White already has a clear advantage, mainly due to the unwise placement of Black's light-squared Bishop early on in the game.

8...Bd7 9.Nf3


I put up another diagram to point out something very important for White. Yes, he has total domination of the light squares, but that doesn't mean that he doesn't have to be extremely careful. He always has to watch out for the move ...d5 by Black. Here, it wouldn't work very well as after 9...d5?! 10.exd5 Nd4 11.Bf4 and now 11...Nxf5 12.Qe2+ or 11...Bxf5 12.O-O, Black would be so far behind in development that White already has a winning advantage. That said, if Black catches up in development and is able to break this barrier of White's, the story may be very different!

9...Qb6 10.Rb1

The Queen's Rook is usually the last piece to get into the game for White in the Closed Sicilian anyway, and so he plays this move so as to free the Bishop to develop. While the move b3 does come in the near future, 10.b3 here isn't very good as it commits too early to the weakening of additional dark squares. White can handle d4 and e5. He is not interested in making every dark square weak though.

This does expose where the White King is going, namely the Kingside, but now the Queen is on b6 instead of a place like h4 or any other square near the White Kingside.

10...Be7 11.O-O O-O

White should not fear the discovered check, and in fact, it's outright bad for Black. After 11...c4+? 12.d4!, White is winning as he dominates the center completely, and undermining moves like 12...d5 fail to 13.e5, and once the Knight moves, 14.Nxd5!

12.Kh1

Now you might be asking "Why did you do this if the discovered check is bad? Don't you want Black to play 12...c4+?" Here you are asking for pipe dreams. If Black was so anxious to do it, he would either play the move right away, or else play a move that possibly threatens to do the discovery in a way that doesn't just win for White. For example, the 13.e5 push in the previous note hits the Black Knight. Maybe if he moves the Knight, he might be thinking about the discovery followed by ...d5. Not saying this works by any stretch of the imagination for Black, it's the concept that I'm illustrating here. Castling did nothing to improve Black's situation in the center, and so yes, the discovery is not a threat.

That said, the purpose of White's move is not to get out of the discovery. It actually serves a completely different purpose all together. Remember when we took with the g-pawn on move 7 instead of the Bishop? Now that the Black King has castled to the Kingside, White has a semi-open g-file with which he would like to place a Rook, and so the King moved over not to avoid the discovery, but rather to give way to a Rook going to g1 eventually. It turns out that the Rook doesn't go there until 15 moves later, as other priorities arise, but the square is available for the Rook once White needs it.

12...a5 13.a4

There is no need to rush the attack on the g-file. First, White settles orders on the Queenside. Black is looking for counter-play by trying to expand on the Queenside. White puts a stop to that with this move, and soon upcoming, he will advance the b-pawn to b3, creating a light-square wedge with a single weakness on c2, and put his Bishop on the long, open diagonal, which combined with a Rook on g1, eyes the g7-square, right in front of the Black King.

13...Nd4 14.b3 Rfe8

Black clearly sees what White is doing when he plays b3. In response, he gets his Rook out of the way so that he can place his Bishop on f8 to guard the g7-square.

15.Bb2 Qc7

The Queen serves no purpose at all on b6 at this point, and does nothing but block the b-pawn. It may be very difficult for Black to get a pawn break in like ...b5, but surely it's not happening with a Queen sitting in its way. The problem is, after Black's early mistakes, and especially the time lost from developing his light-squared Bishop to a bad square early on, it is hard to recommend anything to Black. We will see that the remainder of the game is going to mostly see Black as a sitting duck and White slowly but surely mounting a massive attack on the Kingside.


So now let's consider White's situation. With the Knight well-entrenched on d4, White will not see his Bishop putting pressure on g7 anytime soon. The Rook on b1 needs to get out as well, and so it's time for White to do a re-grouping. The White Rooks have a number of arrangements that they can use, depending on what Black does. They could go to e1 and f1, e1 and g1, f1 and g1, or create a battery on the g-file. It is also important to see which squares can be used and which are controlled by Black. If White is going to do a Rook lift to the third rank, he'll want to do it on the e-file or g-file. It is also important to figure out which piece or pieces of Black's are a problem for White. At initial glance, it looks like the d4-Knight is the only active piece for Black. However, it turns out, White can pretty easily work around this obstacle. Other than controlling e2 and f3, two squares that White doesn't need for the flow of his pieces, it doesn't do much. However, Black will likely need to advance g6 at some point if pressure mounts on the g-file. As we will see, this will open up a wedge for White where he will be able to advance f6. The downside to f6 is that it will open up Black's light-squared Bishop, and as we shall soon see in the game, this light-squared Bishop, that was so poorly developed early on and what currently looks like a bystander, turns out to be the key piece to eliminate from the Black camp, mainly because White will need access to the h3-square for his Rooks.

So let's see how White's plan is executed.

16.Qd2

He starts by getting out of the way of the Rook on b1 to come to the e-file.

16...Rac8 17.Rbe1

The other Rook comes out to a more active place.

17...Bf8 18.Qf2

With the Bishop coming to c1 in the near future, there is no reason to keep the Queen on this diagonal. It is better suited on f2 where it can come in at h4 and possibly a Rook lift will bring a Rook behind it to h3.

18...Ng4

A move that White should actually be glad to see. It forces White to make a move he wants to make anyway, and it removes the guard of the d5-square, allowing the White Knight on c3 to take on the active d5-outpost.

19.Qh4 Ne5 20.Nd5 Nexf3

It turns out this trade really only helps White. If he trades twice, White won't even need to re-locate the dark-squared Bishop. By trading once, it re-routes White's Bishop for him to d1 to take care of all issues of loose pawns on the Queenside. Eventually, White would let them drop like flies if it means a raging attack on the Black King, but here, it just makes White's life easier.

The move 20...Qd8 would put up more resistance. After both 21.Qxd8 Rexd8 22.Nxd4 cxd4 23.Rf2 Nc6 24.Rg1 and 21.f6 Nxc2 22.Bxe5 dxe5 (22...Nxe1?? 23.Ng5 h6 24.Nxf7 and now 24...Kxf7 is mate in 6 starting with 25.fxg7+ while 24...Nxg2 25.Qg3 will force Black to part with his Queen with something like 25...Rxe5 26.Nxd8, which is easily winning for White) 23.Ng5 h6 24.Nxf7 Kxf7 25.fxg7+ Kxg7 26.Nf6 Kh8!, White is winning, but there is still much work to be done in both cases. For example, in the latter case, only the move 27.Qg3 maintains the winning advantage. All other moves are equal or worse for White!

21.Bxf3 Qd8


22.f6! g6

22...Nxc2?? loses to 23.Bh5!!. Now 23...Nxe1?? allows White to force mate with 24.Bxf7+ and now either 24...Kxf7 25.fxg7+ Kg8 26.gxf8=Q+ Rxf8 27.Qg3+ with mate after a couple of useless interposes or 24...Kh8 25.Bg6 h6 26.fxg7+ and no matter which legal move Black plays, it will be followed by 27.Qxh6 and mate the following move.

If instead, after 22...Nxc2?? 23.Bh5!!, Black plays a move like 23...Re5, then 24.Bxf7+ still works, but it will take longer to hunt down the King.

23.Bd1 Re5 24.c4!

Stopping any thoughts of a breakthrough by Black of ...b5 to get active.

24...Be6 25.Bc1

Bringing the final piece into the game.

25...Rb8

25...Bxd5 would voluntarily help White eliminate the one problem piece that is covering h3.

26.Ne7+ Kh8

The other two legal moves are worse. Of course taking with the Queen makes no sense at all. After 26...Bxe7 27.fxe7 Qe8 28.Qf6 Bh3 (to open up e6 for the Knight) 29.Rf4 and there is no way for Black to avoid getting his Bishop trapped. The pin doesn't work for Black as after 29...Bf5, White can just take it with the Rook and opening of the g-file with the pawn capture is fatal, and so Black still drops a piece.

27.Rg1 Qe8 28.Ref1 Bd7 29.Nd5

White has no interest in allowing Black to sacrifice the Rook for Knight and Pawn. Yes, he can still take the Knight with the Rook, but then the f6-pawn stays!

29...Be6

This move and the next actually helps White. If instead, Black just sits and says to White "Prove it!", and plays something like 29...b6 followed by maybe 30...Rb7, White's idea, based on the fact that the f8-Bishop and f7-Pawn are stuck, blocking Black's other pieces from defending the g- and h-files, is to double the Rooks on the g-file with Rg3 and Reg1, making any captures with the g-pawn impossible as Rg8 would then be mate, and then playing Nf4 and Bh5 (again, based on the Rg8 tactic), and sacrificing a piece (likely the Bishop) on g6 to break through at the King once all of White's pieces are ready since it will open up Black's 7th rank for him when he plays ...fxg6.

Instead, Black sets himself up for immediate disaster.

30.Nf4

With the idea of what was just mentioned, doubling the Rooks next, but this Knight move was played first specifically in response to Black's last move because the moment he plays the following move ...

30...Kg8?

White has the green light to take the Bishop, the piece that we noted back after 15 moves would likely be the problem piece for White!

31.Nxe6! 1-0

Black resigned here, which may seem early at first glance, but this is not unusual in correspondence chess, where your opponent has tons of time and you will not beat him due to time pressure. All recaptures for Black are terrible.
  • Of course, the reason for taking specifically when the King moves to g8 is that now 31...fxe6 32.f7+ wins the Queen.
  • 31...Rxe6 simply allows 32.Rg3 and 33.Rh3, with the assistance of the other Rook going to g1 if necessary, and the Bishops cover all the squares in front of the pawns, stopping Black from blocking White's attack down the h-file. Advancing the h-pawn is also fatal for Black.
  • 31...Nxe6 allows 32.Rf3 with a similar idea to taking with the Rook, only now the other Rook is already on the g-file.
  • Taking with the Queen via 31...Qxe6 is relatively best, but Black is still totally busted. 32.Bf4 allows a Rook sacrifice that at least temporarily ties White down after 32...Rxe4 33.dxe4 Qxe4+ 34.Rg2, which is annoying, but White will get out of it with still a winning advantage, and 32.Rg3 allows the annoying 32...Nf5 33.exf5 Rxf5 34.Rxf5, but all that it is is annoying, nothing else. White is still easily winning after both 34...Qxf5 or 34...Qe1+, which does win the d1-Bishop as the Rook on g3 is pinned to the Queen and therefore cannot interpose, but it's not enough.


So what we saw here was Black being tied down to a passive position, and White having basically all the time in the world to build the attack on the Black King, and then White proceeded to eliminate Black's key piece that was stopping White's main idea, doubling up on the h-file, at the right tactical moment such that Black could not recapture with his pawn and open up the 7th rank for his heavy pieces to defend his King, and so with Black's King blocked off by his own pawn on f7 and Bishop on f8, neither of which could afford to move, White used that to his advantage to get at the Black King.

So remember, when you have an attack on the opposing King, and the opponent has no counter-play, there is no need to rush the attack. First, you prevent all counter-play by the opponent with prophylactic moves like 24.c4 was in the game, you get all of your pieces into the game, not just one or two, you eliminate that one loose nail that is holding the entire structure intact, which in this case was the light-squared Bishop, and only then do you go for the kill on the opposing King.

On the flip side, to avoid getting into this mess, it is vital that you clearly understand and envision what your opponent is doing early on, and make sense out of where each of your pieces need to go. Don't just randomly place them and say "Hey, they are controlling the center". What we saw here was a case of poor development of the light-squared Bishop. The problem was that the best square for the Bishop was not clearly defined. White could have been going for ideas with an early f4, or he could be holding the pawn back and developing with moves like Be3 and Qd2. Now given the fact that Black hasn't fianchettoed his Bishop, the f4-idea is probably pretty obvious. What is White attacking with that battery on e3 and d2 if Black doesn't fianchetto? He doesn't have weakened dark squares like he does if he plays ...g6 and ...Bg7? So the holding back of the King's Knight should have been an obvious sign for Black that f4 was coming, and with ...Nf6 already played, not enabling ...f6 to retreat the Bishop to f7, it should have been obvious that 5...Be6 was not a good move, and that it would lose time for Black, and ultimately the game. The Queen's Knight had a defined place to go, c6. The dark-squared Bishop had 2 options and that was it. Go to e7, or fianchetto. The situation for the light-squared Bishop was fluid. When you develop, unless there is a tactical reason not to do it, you should always develop the pieces that have known roles first. This is why the old adage came out "Knights before Bishops". Now that is a little too generic to say that it always applies, but Knights almost always want to go toward the center, and so c3, f3, c6, and f6 are usually the most desired squares, with d2, e2, d7, and e7 usually next in line, and only rarely do they develop to the edge. Bishops have a number of squares on the diagonal, and it is often best to see how the opposing pawns are set up, and your own pawns for that matter, before automatically developing your Bishop except in known cases from theoretical openings, like here in the Closed Sicilian, fianchettoing the King's Bishop early is almost never a bad idea, but the Queen's Bishop is often the last or sometimes second-to-last minor piece developed - sometimes the King's Knight is delayed for specific reasons in this opening.


That will conclude this article on Developing Your Pieces Wisely. Once another decisive game or really amusing draw comes up, I'll be back to cover it. Until then, stay safe, and good luck in whatever online play you may be doing during the pandemic.

Monday, June 29, 2020

The French Connection: Volume 39

Hello everyone and welcome to the thirty-ninth edition of The French Connection. Back in The French Connection: Volume 9, we looked at what Black should do when facing what I referred to as "Garbage Lines". Well, we have another one here, and so this article will mainly be of use to players that play specifically the Black side of the French Defense. While going through the game, take a look not at what the material count is, but rather, which pieces are actually doing something on the board. We will see one piece in particular being utterly useless for virtually the entire game!

Without further ado, let's take a look at the feature game.


2020 Lockdown Cup - (Prelim Bracket 2)
W: Steve Malone (Unr)
B: Patrick McCartney (1900)

1.e4 e6 2.d4 d5 3.Nc3 Bb4 4.Bd2

We saw this same move played in The French Connection: Volume 37 as well. The difference is in that game, we saw the normal follow-up where White goes after Black's weak g7-pawn in return for opening the center. In the current game, we are going to see some very weird play by White, and it is critical to understand why White's moves are inferior, and why simply "memorizing lines" is insufficient.

4...dxe4 5.g3?


The only good move for White here was 5.Qg4, as seen in Volume 37. Another bad move is 5.Nxe4 as Black simply answers with 5...Qxd4! and White has no compensation for the lost pawn.

But now what? What does 5.g3 do? Why would White play this move? Well, clearly he wants to play 6.Bg2, where the Bishop would be attacking e4 along with the Knight on c3. Can White really get away with this? The benefit for Black behind the 5.Qg4 line is that it takes White a number of moves to get the Queen back into the game after she grabs the g7-pawn, and those extra tempi are what keep Black in the game as that line is very tricky, as we saw in Volume 37.

So if we give White the pawn back without making him waste time, he will likely be better. So the first thing to realize is that Black cannot give the pawn away to White that easily. So the next couple of moves should be fairly clear to understand.

5...Nf6

Protecting the e4-pawn.

6.Bg2 Bxc3!

Yes, Black is giving up the Bishop pair voluntarily, but it is the only way to continue to make White work to get the pawn back.

7.Bxc3

Now there is no good way for White to attack the d5-square, and so if necessary, Black can always put his Queen on d5. Of course, here, there is no threat at all, and so Black takes the time to castle.

7...O-O 8.Ne2 b6

Preparing to put the Bishop on b7, adding another defender to the e4-pawn.

9.O-O Bb7 10.Qd2

Other than connecting the Rooks, what has White achieved? The answer is basically nothing! The Bishop on c3 lacks scope. The e4 pawn impedes the g2-Bishop. The Knight on e2 is passive. The Queen on d2 isn't doing much. And then which files does White intend to put the Rooks on?

Black has a more clear cut plan. He needs to develop his Knight, but he also has the semi-open d-file, which clearly screams for a Black Rook. Therefore, he gets the Queen out of the way.

10...Qe7


11.Bb4?

This is a classic case of forcing your opponent to do what he wants to do anyway. The c-pawn wants to expand to c5. The reason Black hasn't done it yet is that he wants to get his pieces ready before opening the position for the White Bishops. By going to b4, White is wasting time just to force the issue. Better would be to attempt to impede Black's expansion with 11.b4, giving the Bishop the b2-square if it needs to retreat, and at the same time, making ...c5 not look all that attractive for Black.

11...c5 12.Ba3?

Ok, the first think to ask is why did White not play 12.dxc5? It is the only move that makes sense, opening up the long diagonal for the Bishop where it can return to c3, and giving White isolated a- and c-pawns. Black is still winning in this line, but it still requires work. With his Queen on e7, Black can answer 12.dxc5 bxc5 13.Bc3 with 13...e5! and Black has a winning position. That said, at least White is trying to put up a fight.

With the move played in the game, he does nothing to weaken c5, and where is the Bishop going? It is now going to take multiple moves just to get it back in the game. For the moment, White is "virtually" down a full piece!

12...Rd8 13.c3

Putting yet another White pawn on another dark square.

13...Nc6 14.Rad1


So now let's look at the position. Both sides have one very inactive piece. For White, it's the a3-Bishop. For Black, it's the a8-Rook. The difference is that all Black has to do to activate the Rook is lift the d8-Rook and then move the a8-Rook to d8. Problem solved.

White, on the other hand, has a major issue. The Rook has moved from a1 to d1, so if White wants to lift the b-pawn and bring the Bishop back to c1, he needs to play b3, Bc1, and move the Queen out of the way somehow, just to bring life to the Bishop. Three moves. The d-pawn is pinned by the Black Rook to the White Queen, and playing b4 to try to crack the c5-pawn is highly risky. Therefore, White's best hope is the plan of b3, Bc1, and moving the Queen.

So with that said, this calls for an attack by Black. If Black slow-plays it, the Bishop comes back into the game and White is alive. So three quiet moves allows White to give scope to the Bishop, and a fourth quiet move will allow the Bishop out to an active location. If Black doesn't make a lot of quiet moves, he will virtually remain up a full piece as until it comes out, the Bishop on a3 is utterly useless.

14...Ne5!

Using the pin on the d4-pawn to threaten an incoming wedge on f3.

15.Qf4

This does nothing to stop it, and so therefore ...

15...Nf3+! 16.Kh1

No better is 16.Bxf3 exf3 17.Nc1 e5 18.Qxe5 Qd7 19.Nd3 Re8 20.Qg5 Ba6. Even if White somehow grabs the f3-pawn after something like 21.Qf4, all that will do is open up the diagonal for the Black light-squared Bishop, and in this case, White would have no Bishop to contest it, and the long diagonal would be fatally weak.

16...e5! 17.Qc1

What does this do other than further impede his own Bishop on a3? The answer? Pretty much nothing! That said, even after 17.dxe5 Rxd1 18.Rxd1 Nxe5, Black is winning. With no pawn on d4, there is zero pressure on the c5-pawn, forcing the Bishop to take the back door route to get out.

17...exd4 18.Bxf3


Now the automatic reply would be 18...exf3, and that would of course win for Black, but Black went for a more sophisticated approach. By taking on f3 and allowing White to take on d4, White could potentially open up the long diagonal and work on getting the Bishop to b2 to activate it.

18...d3!

Two White pieces are under attack, and so Black will regain the piece eventually. Even if it does cost Black a pawn, he was already two pawns up, and the advanced pawn will force White to spend more time stopping it instead of getting his Bishop back into the game.

19.Nf4 d2!

Forcing a White piece onto a dark square.

20.Rxd2 Rxd2 21.Qxd2 exf3

And now it is finally time to take the piece back.

Black is still up a pawn, and the Bishop on a3 is still there, and it still will take 3 moves to activate. The diagonal to do that on has changed, and now the three moves to activate the Bishop are c4, b3, and Bb2. We will see that White gets ONE of these moves in.

22.Re1 Rd8!

Black uses tactics to activate the Rook. White can trade the Queens if he wants, which Black would not object to at all, but he doesn't have time to take the Bishop due to an unusual back rank mate as instead of the King being blocked by all White pawns, one square is instead guarded by the Black pawn on f3.

23.Qc1

White of course preserves the Queens, but it has been chased off of the open file to an inferior square.

23...Qd7 24.c4

Black used a quiet move to save the Queen, and gave White his first opportunity to work on getting the Bishop out. He still needs to find two more moves to get the Bishop out.

24...Ne4 25.h3

Now, of course, Black can take on f2 and he'd be completely winning, but Black wants more.

25...g5!!

This move is extremely strong. It eliminates any back rank issues, freeing the heavy pieces to do as they need. The Knight can't be moved anywhere other than 26.Ne6, which Black can easily take as the Knight on e4 guards g5, giving Black just enough time to take the Knight without having to worry about White's Queen taking on g5 and annoying the Black King.

26.g4

White, of course, doesn't move the Knight, and tries to block the route for the Queen.

26...Nxf2+

And so now Black takes the pawn with check.

27.Kh2

27.Kg1 Nxh3+ is even worse.

27...Qc7!

Pinning the attacked Knight to the King, which in turn blocks the Queen from attacking the pawn on g5.

28.Kg1 Nxh3+ 29.Nxh3

This allows mate in 2, but even after the best move, 29.Kf1, White is getting mated in 8 moves instead of 2.

29...Qg3+ 30.Kf1 Qg2# 0-1


So what we saw was pretty much a debacle. The 4.Bd2 line of the French is not popular, but it's also not busted. However, White must be willing to take time to regain the pawn in the form of the g-pawn, not the central pawn, and the Queen goes out in the open early. Here, White tried to get the central pawn back, and tried to do it only developing minor pieces initially. To understand how one must react to this unusual idea, you have to think about what it is that White was trying to achieve, and realize that you cannot just blindly allow it. Otherwise, you lose all those gained tempi that you get in the main line with the Queen out there in the open. So Black started off by doing what had to be done to hold on to the extra pawn, despite having to give up the Bishop for a Knight. Then White does nothing to pressure e4, and goes completely the wrong way about activating the uncontested dark-squared Bishop, and instead it ends up locked on a3. Black must now realize that it will not be locked for ever, and that he needs to play very actively, and so he got his Rook instead of his Queen onto the d-file, used the pin to get the Knight into White's territory, took the opportunity to remove the possibility of cxd4 for White with the in-between move, 18...d3, and then used tactics against the White Knight that was at first overworked and then pinned, and Black kept the foot on the gas, playing only one quiet move that gave White time to get only one of his three needed moves in to activate the Bishop, and so while "officially", White played the bulk of the game down a pawn, in reality, he was playing down a full piece!

When your opponent plays garbage in the opening, compare the threats of the weird move to what Black normally gets from White's "normal" threats after a "normal" move, and use that to determine what must be done against the weird move. In this case, it was to keep the pawn, and things fell apart after that for White. In another case, it may be something else, like taking control of a square, or eliminating a certain piece. Always make sure you understand the strategy of the opening you play and not just memorize lines.

This concludes this edition of The French Connection. Till next time, good luck in all of your French games, Black or White!

Wednesday, June 3, 2020

State of the CCCSA

State of the Charlotte Chess Center
Written by Founding Director, FM Peter Giannatos


Dear CCCSA Members and Center Supporters:

I miss you! It feels like it's been so long since we've seen one another. I am fortunate to have kept up with many of you virtually through email and streams. I wanted to draft a note about the current state of the CCCSA, what we have done, and where we are going. I hope you find this post helpful and informative.

Peter Giannatos
Founder and Director
peter.giannatos@charlottechesscenter.org


Synopsis of Events Since March

  • Free Weekly Chess.com Tournaments

  • Free Live Weekly Lectures/Streams
    • Nearly 1800 followers on our Twitch channel
    • Over 40 streams with 70+ average viewers/stream
    • Instructional Content for Adults and Students
  • Matches Between CCCSA and Other Chess Clubs in the US
    • Team Matches Against: Saint Louis Chess Club, Mechanics Chess Institute, Memphis Chess Club and Marshall Chess Club.
    • Featured CCCSA member/players of all ratings levels
  • Custom Videos for CCCSA Students in Our School Programs
    • Coach Chris Callahan made over 30 videos for our students.
    • During the school year, the CCCSA taught 2000+ students weekly in school programs
    • In an effort to reach more students in need during the pandemic, the CCCSA offered these videos to all students in our member schools.
    • Sample video below:


  • Virtual Elite Day Camps
    • Top Instructor Names Include: GM Judit Polgar, GM Peter Svidler, GM Lenier Dominguez, GM Sam Shankland, GM Ruslan Ponomariov and many more!
    • (4) 2700 FIDE Rated GM Instructors, (15) 2600 FIDE Rated GM Instructors
    • Students all over the US participated in these camps


  • Online Academy Classes
    • The CCCSA moved all of its Academy Classes online.
    • Students received lessons via zoom and had supplement homework for each class
    • Coaches Alex Velasquez, David Cogswell and GM Daniel Naroditsky led the classes.


New Online Tournaments and Camps
  • Charlotte K-12 Online Championship Series (Begins June 13)

  • Chess Fundamentals Camps
    • Led by local masters: FM Peter Giannatos and NM Dominique Myers
    • Designed for rated players under 1300
    • Learn from instructors you will see again ☺
    • Distinct topics of discussion ranging from opening play to endgame play
    • More information here: https://www.charlottechesscenter.org/fundamentals

  • Chess and Art Camps

  • Elite Chess Camp (Week)
    • For the top juniors in the US.
    • Features top trainers: GM Jacob Aagaard, GM RB Ramesh, GM Boris Avrukh, GM Daniel Naroditsky
    • Camp is completely full with over 40 students.

  • Online Chess.com Tournaments + Lectures to Continue


Center Reopening
  • Plan on opening with limited offerings in mid July
  • Safety precautions will be taken, including but not limited to: temperature checks, mouth covers (masks), hand sanitizer stations, extra cleaning measures.
  • Activities likely to be offered:
    • Small classes
    • Small camps
    • Small tournaments
  • Online events will likely continue for a few months after the phased reopening of the CCCSA
  • All of the above contingent on recommendations of local health officials. At this time, the CCCSA is legally permitted to open, but we have decided to take additional precaution and wait until July.
Ways to Support


The CCCSA wants your support much more than it wants your donations. As you can see, we are offering quite a bit to our members and supporters (free and paid). I was a bit taken aback by the lack of participation of our local junior players in camps and classes. I'd like to hear from members about what they would like to see from the CCCSA moving forward (see meeting below).

Ways to Support:


Why support your local club?
  1. You will have to see us again ☺
  2. We will continue to provide opportunities for years to come
  3. Students should become comfortable and familiar with local coaches who they will engage with throughout their chess growth
  4. Chess clubs do not grow on trees, OK, I say that with a bit of humor, but you get the point. We want to continue to provide the Charlotte area with the best in chess, in order to do that, we need your support!
  5. I would like your input. Therefore I have scheduled a live zoom meeting for this Saturday at 11:00am. All parents and members are welcome to attend this meeting. See link below:


Topic: CCCSA Members Meeting
Time: Jun 6, 2020 11:00 AM Eastern Time (US and Canada)

Open to First 100 to Join

Join Zoom Meeting
https://us02web.zoom.us/j/86811372521


Should you want to donate to the CCCSA, please reach out to us. All donations ensure the longetivty of the CCCSA and support our instructors.


Sunday, May 31, 2020

The French Connection: Volume 38

Hello everyone and welcome to the thirty-eighth edition of The French Connection. In this one, we are going to be looking at an interesting early check for Black in the Tarrasch Variation and be looking at another game from the Lockdown Cup. With the feature game, we will be looking at what is one of only two lines that White can play that pose any question at all to Black's idea, and so we will be looking at that line along with why other lines just don't do the job, and maybe we'll take a look at the other main line in another article when we see it featured in an actual game.

Without further ado, let's take a look at the feature game.


Lockdown Cup 2020 - (Prelim Bracket 2)
W: Lester Weiss (2153)
B: Patrick McCartney (1900)

1.e4 e6 2.d4 d5 3.Nd2 c5 4.exd5 exd5 5.Ngf3 Nc6 6.Bb5


Some that may have followed this blog all the way back to 2017 when I wrote the French repertoire along with posts on chess.com might be wondering why I didn't play the line I preached, which is 5...Nf6 (instead of 5...Nc6) 6.Bb5+ Bd7 7.Bxd7+ Nxd7 8.O-O Be7 9.dxc5 Nxc5 10.Nb3 Nce4. I still play this line as well, but I play almost any line of the French Defense.

That said, the old main line, which is still played today, sees Black playing 6...Bd6 here, after which we see White trading on c5 with 7.dxc5 Bxc5 and then 8.O-O Nge7 9.Nb3 and the Bishop retreats to d6 (more popular) or b6. I still to this day have little interest in that line as Black.

However, Black has another interesting move here that caught my eye and is why I went ahead and played 5...Nc6 instead of 5...Nf6.

6...Qe7+

This might, at first glance, look like a dubious move, putting the Queen on the same file as the King. In the line with 5...Nf6, after 6.Bb5+ Bd7, instead of trading on d7, there is the line where White tries to grab a pawn, at least temporarily, with 7.Qe2+ Be7 8.dxc5. The major difference between that line for White and this line for Black is that Black has no intention of staying on e7 with the Queen, whereas the other line for White, he actually leaves the Queen on e2, trying to hold the extra pawn, and if Black finds the right response, he really has to let it go, but if he doesn't, White just ends up a pawn ahead, but that's a big if, and if Black does play it right, it results in a major waste of time for White.

Here, however, the idea is simple. Just like in the 5...Nf6 line, Black would really like to develop the Knight actively on f6 rather than the passive e7-square. In the normal main line with 6...Bd6, White's development flows smoothly. He hands Black the Isolated Queen Pawn. He makes the Bishop move twice, similar to the battle of the tempo in the Queen's Gambit Declined. He gets his Knight out of the way of the Dark-Squared Bishop with the gain of tempo by making the Bishop move a third time, and to avoid problems on the e-file, Black has to develop his Knight passively on e7. By giving this check, White's decisions are highly limited. Unlike the line where White tries to win a pawn mentioned above, in this case, the King's Bishop has already been developed to b5. Interposing with the Bishop doesn't develop the Bishop like it does for Black when White plays 7.Qe2+. It in some ways "undevelops" it. Forces White to move it to a more passive position. But it turns out, that really is White's only choice if he wants to try to maintain any sort of an advantage, and so therefore, the move played in the game was as such.

7.Be2

Other moves either get White nothing, or lose outright. For example, 7.Ne5?? f6 drops a piece, and 7.Kf1 just hems in the Rook. The only other practical choice is 7.Qe2. The problem is that it achieves absolutely nothing for White. After 7...Qxe2+, you've got 8.Kxe2 and the amateurish 8.Bxe2. The problem with the latter is that Black now has 8...Bf5!, a move that is ineffective if White immediately retreats with the Bishop as the Queen covers c2. Here, both 9.dxc5 Bxc2! 10.b3 Nf6 (taking the pawn is dubious as 10...Bxc5?! 11.Bb2 creates the dual threats of 11.Bxg7 and 11.Rc1, skewering the Bishops, forcing 11...Bf8, and after 12.Rc1, he must retreat his other piece, and the lack of development is worth the pawn, and so Black should leave it alone) 11.Bb2 Bg6 and 9.c3 cxd4 10.Nxd4 Nxd4 11.cxd4 Rc8 give Black no problems at all. That leaves 8.Kxe2, but now, Black can force White to surrender the Bishop pair with 8...a6!, when after 9.Bxc6 bxc6, White must play 10.Re1 just to maintain equality, forcing Black to play 10...f6, taking the desired square away from the Knight, and after 11.dxc5 Bxc5 12.Nb3 Bd6 13.Be3 with either 13...a5 or 13...Ne7, we have a dynamically level position. Black has an extra pawn island, but he also has the Bishop pair in a fairly open position.

There is absolutely no reason to be afraid of the Queen trade. However, now that the Bishop has been forced to retreat, Black is ready to re-locate the Queen.

7...Qc7

The reason for playing this move immediately is the c5-pawn. If Black does not move the Queen now, then White can take on c5 and Black will have to take back with the Queen, which is undesirable. Now, if White takes, Black will take with the Bishop and develop yet another piece.

8.dxc5

More normal here is 8.O-O Nf6 and only now 9.dxc5 Bxc5 10.Nb3 Be7, which the game transposes to after Black's 10th move. I mention this move order because the alternative to 9.dxc5 is the prophylactic move 9.Re1, which is supposedly the most challenging move for Black, and if I ever am faced with this line, I will likely cover it in another article, but this one here is all about the 9.dxc5 line, the only other options that poses any questions at all to Black's 6th move, along with earlier deviations and how Black should react to them.

8...Bxc5 9.Nb3 Be7 10.O-O Nf6

Transposing back to the main line. Now, the question becomes, where does Black want to place his pieces? In this line, the ideal setup is to get his King's Knight to e4 while the other stays at c6, temporarily brings out the Light-Squared Bishop to connect the Rooks, create a battery with the Rooks on the e-file, and then retreat the Bishop back, with a dominance on the e-file, as we will see here in the game.

11.Bg5 O-O 12.c3 Be6 13.Nbd4 Rae8

The right place for the Black Rook. This is more desirable than the passive 13...Rad8, simply guarding the pawn. Now the onus is on White to play the right move.


14.Re1!

The correct move here! Taking either the Knight or Bishop will only help Black's pawn structure, and the dubious idea of trying to re-route the Bishop with 14.Bh4?! only backfires after 14...Ne4, removing all dreams of taking over the h2-b8 diagonal, and after 15.Bxe7 Rxe7 16.h3 Bc8 17.Qd3 Rfe8, Black has the perfect setup that we just talked about.

Now, we have an interesting position, and I came up with Black's next move, which I have yet to see be played anywhere.

14...h6

This Queen check line was covered in New In Chess Yearbook 119 back in 2016 by Dejan Antic, a Serbian Grandmaster. Here, he cites the game Mladenov - Trella, Germany 2014 to illustrate the idea behind 14.Re1, giving 14...a6 15.Qc2 Ne4 (Here he recommends 15...Ng4 on the basis that if the Queen and Bishop are still lined up on d1 and e2, go to e4, but if one of them has changed diagonals, possibly going to g4 is better, which here he gives an exclam to 15...Ng4, calling it unclear) 16.Be7 (Here he points out that White can also play 16.Nxe6 fxe6 17.Bxe7 Rxe7 18.Bd3 with a small advantage and is probably why he favors 15...Ng4) 16...Rxe7 17.Bd3 Nxd4 18.Nxd4 Nf6 19.h3 Rfe8 20.Rad1 Bc8 21.Rxe7 Rxe7 22.Qb3 g6 23.Bf1 h5 24.Be2 Re5 25.Bf1 Kg7 26.a3 Bf5 27.Nxf5+ Rxf5 28.Be2 Re5 29.Bf3 Qe7 30.g3 with an unclear position.

This is all fine and good. However, I think he misses the ship completely. I do not believe 14...a6 is very good for Black at all, and that White should answer not with 15.Qc2, but 15.Nxc6!. Now after 15...Qxc6 16.Nd4 Qc5 17.Bd3, White is for preference as the freeing move 17...Ne4? drops a pawn for nothing after 18.Bxe7, and otherwise, Black's position is really bottled up while White is free to maneuver. Artificial intelligence also claims +/= for White. The other option, 15...bxc6, looks at first like Black should be ok since after 16.Bxa6, Black can play 16...Qb6 and force White to either give the pawn back, or else put his Queen on the dangerous open e-file with 17.Qe2. The problem is, the latter works thanks to Black's two Bishops being in the way, giving White just enough time. For example, after 17...Bd8, threatening discoveries on the Queen, White has 18.Be3! with a practically winning position. Of course, this is not all forced, but a pawn is a pawn, and while White might have to spend an extra move to re-group, the compensation Black gets for the pawn is nowhere near enough.

Therefore, I think Black should keep the a-pawn back for as long as possible, and hence my novelty of 14...h6. It kicks the Bishop back with tempo, and prepares Black's expansion that comes up shortly. He should not be afraid of a Knight or Bishop coming to b5. With the Knight, Black can simply retreat to b8 and then when the time is right, kick the Knight back by playing ...a6 with tempo. In the game, White never goes down that rabbit trail, and rightfully so.

15.Bh4 Ne4

There's the freeing move, getting the Bishops off the board and opening up for Black to double on the e-file.

16.Bxe7 Rxe7 17.h3 Bd7

It seemed like this square was better than going all the way back to c8. There is nothing to worry about on b7, and since ...a6 was not played, I over-protected the c6-square in case the Bishop thinks about coming to b5. It should also be noted that the abandoning of the protection on d5 is not a problem for tactical reasons.

18.Bd3

18.Qb3 poses no threat to the d-pawn because Black has 18...Rfe8! where 19.Qxd5 can be answered by 19...Nxd4 20.Qxd4 Nxc3! and one could even argue a miniscule advantage for Black in this line.

18...Rfe8

Completing the mission of getting the Rooks lined up on the e-file. Next we will see Black start to expand on the Kingside.

19.Qc2 Qf4

Also possible here are 19...g5, and the more reserved 19...Qd6. Either way, the position should be dynamically equal. The important part for Black is to remain active. If he sits back for too long, what might be a teeny-tiny advantage for White will turn into a big advantage because of the isolated pawn. The player with the isolated pawn is the one that needs to stir up activity to compensate, and so Black is coming in to attack the White Kingside.

20.Rad1 g5 21.Re3 f5


So now Black has the space advantage, but he is still saddled with that weakness on d5. White can kick the Queen out with 22.Ne2, which might leave White once again with that "teeny-tiny" advantage that Black should have no real problems holding on to the balance. However, White sees two hanging pawns on b7 and d5 and plays ...

22.Qb3

The only problem with this move is that it allows Black to force a draw immediately. Do you see how?

22...Nxd4!

All other moves pretty much lose for Black.

23.cxd4

Of course, 23.Qxd5+?? would lose to 23...Ne6!

23...Nxf2!!

And there is the dagger. All hopes of winning for White are gone!

24.Qxd5 1/2-1/2

White realized this now and offered the draw, which I accepted. Just to show the lines, let's say this game went on. First thing to note is that 24...Be6?? is losing due to 25.Rxe6!! Rxe6 26.Kxf2 Qe3+ 27.Kf1 g4 28.Ne5 g3 29.Qf3 and White is winning. If 29...Qxd4, then 30.Qxg3+. Moving the King anywhere also fails to 25.Rxe7 followed by 26.Kxf2. So 24...Re6 is forced. Now White has a couple of ways to draw, but taking the Knight loses. The following are White's options:
  1. 25.Kxf2?? loses to 25...Qxe3+ 26.Kf1 and now any type of Re1 move is not a saving grace for White like it is in line B because Black can take the Bishop with check, and so therefore, after 26...g4 27.hxg4 fxg4 28.Qxd7 gxf3 29.Qh7+ Kf8 30.Qf5+ Ke7 31.Qc5+ Kd8 32.Qd5+ Kc7, white only has one more check if he wants it or can take the pawn on f3, both of which win easily for Black.
  2. 25.Qxd7 does draw for White only because of one saving grace. After 25...Qxe3, White has the miracle draw with 26.Re1 and Black loses too much material if he doesn't take the perpetual, and White gets mated if he tries to avoid it. After 26...Nxh3+, both sides have to repeat via 27.Kh1 Nf2+ 28.Kg1 Nh3+ etc, as both 27.Kh2 and 28.Kh2 lose. After 27.Kh2 (with the Black Knight on h3), Black wins after 27...Qf4+ 28.g3 (28.Kxh3 g4+ 29.Kh4 g3+ 30.Kh3 Qg4#) 28...Qxf3 and White has to give up his Queen on e8 to prolong the game as 29.Rxe6 Qf2+ 30.Kxh3 g4+ 31.Kh4 Qh2# is mate. Instead, if 28.Kh2, where the Black Knight is on f2, then 28...Ng4+ 29.Kh3 (29.Kh1 Qxe1+ leads to a back rank mate while 29.Kg3 Qf4+ followed by 30...Nf2# is also mate) 29...Qf4 30.g3 Qxf3 31.Bc4 Nf2+ 32.Kh2 Qh5+ 33.Kg2 Qh3+ 34.Kf3 (Taking the Knight leads to mate in 11) 34...g4+ 35.Kf4 (Again taking the Knight is mate in 11) 35...Nd3+ 36.Bxd3 Rxe1 is easily winning for Black. Therefore, the perpetual would have to be taken.
  3. 25.Rde1 is the cleanest and most obvious forcing of the draw. Black can try 25...Nxh3+ 26.Kf1 Qg3 27.gxh3 Qxh3+, but it still only leads to a draw, or he can simply take the Bishop with 25...Nxd3, after which the draw is routine. White takes three times on e6, ending with the Queen, and Black can't get out of check as he has to move up to g7 or h7 to hold the h-pawn. After 26.Rxe6 Bxe6 27.Rxe6 Rxe6 28.Qxe6+, a silly move like 28...Kf8 allows 29.Qxh6+ and now White's winning, and so he must play 28...Kg7 or 28...Kh7 and the checks cannot be escaped, and so the result is a draw.


An interesting game that illustrates the dynamics of the 6...Qe7+ line of the Tarrasch when White plays 9.dxc5. Again, he does have one other alternative in 9.Re1, but pretty much all other moves cause Black no problems at all. A few things for Black to remember are to always move your Queen immediately after the check if White interposes with the Bishop so that you can take back on c5 with the Bishop if the pawn is captured by White, and that with the isolani, you do not want to passively defend the isolani with a move like ...Rad8, but rather, your ideal setup is to get the Knight to e4 and double the Rooks on the e-file. As the game proceeds, your number one priority as Black is to remain active! This will often lead to the dynamic balance between space and activity versus pawn structure.


This concludes this edition of The French Connection. Until next time, good luck in all of your French games, Black or White!